Showing posts with label bathroom. Show all posts

5.07.2010

The Way To A Man's Heart Is Through His Fly

Gasp! Did I just insinuate something dirty?

Why, yes, yes I did.

Let's start things off with a little story and then we'll get to the goods. May I suggest you grab a drink (iced tea would be most appropriate for this tale) because this post is sure to be a long one.
Back in the halcyon days of college, Matt and I started dating when he was a fourth year and I a lowly second year. Fourth-years, particularly those of the male variety, tend to have a lot of extra time on their hands. And so it was, with this extra time, that Matt could often be found out in the mountains of Albemarle, fishing rods in tow, little black lab trotting alongside him while the trusty ol' red jeep sat on the gravel dirt road, awaiting their sure-to-be-filthy return.

A key indicator that fishing was on the agenda? Matt's ratty old hat, acquired from his favorite fly shop, that had the cheeky message, "The way to a man's heart is through his fly." He sported this thing every day until Hootie Bootie ate it in a fit of boredom while we were at a horse race or something. Look closely below and you'll see I'm not making this stuff up.

Were I a true, proper Southern gal I may have been repulsed. But I've got coarser Yankee blood and love to throw a "that's what she said" out there whenever applicable so the hat's message caused me to roll my eyes with affection.

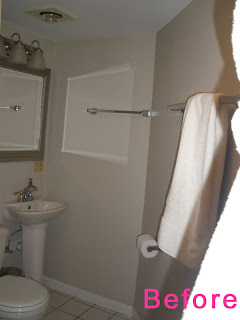
Fast forward four years and I decide to move back north to Chicago, dragging Matt out of the woods and into the city. Fast forward another four years and I drag Matt out of the city and into our basement, armed with the brilliant idea of gutting the place and reinstalling a perfectly functional but currently fugly bathroom. Take a quick visual inventory of what we were working with, would you?
Some of you know the middle part of the bathroom tale. Like the part where we tore up the floor and were trying to decide how to cram existing bathroom fixtures in a new space half the size of the old.
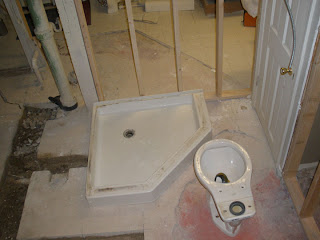
And some of you also know that I painted the basement twice, my decorating M.O., and in the case of the bathroom it still wasn't right.

Just as I thought I was losing his interest in home renovation I came across a little design element that I knew would win him over. Since this is a bit of a gentleman's bathroom, why not bring a little gentlemanly sport to it? Some posh flyfishing wallpaper from England got Matt back on the basement reno path. The hat's message was applicable again! The way to this man's heart is through his fly. So without further ado, I present our basement loo:

I know wallpaper ain't everyone's cup of tea, or bourbon, but friends, we love this little room. Like, luuuurve it. And as for all our grand plans of reusing the old stuff in order to be budget-smart, this is one case where I'm glad that idea flew the coop. This tiny slice of our city cottage reminds us both of life in the South and once we committed to the fishing wallpaper we ran with it. Let's stand in the middle of the room and take a tour:
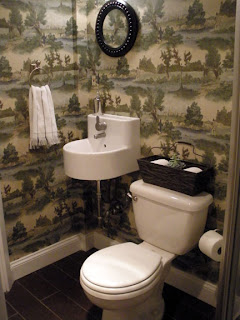
You've seen the Ikea Ann sink and now you can see it dressed up with a $19 mirror from Hobby Lobby, whose riveted frame gives a gentle nod to the classic Federalist hostess mirror.
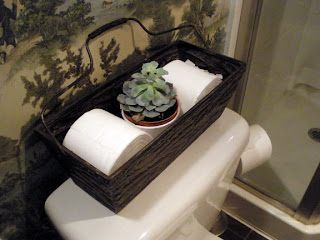
Atop the commode (another word no one uses anymore!) is a small metal basket plucked from TJMaxx for $8 and is the perfect container for spare toilet paper and a petite Ikea-grown succulent. While the plant leaves coordinate perfectly with the shades in the wallpaper I can't say this was a deliberate pairing. I'm not that anal!
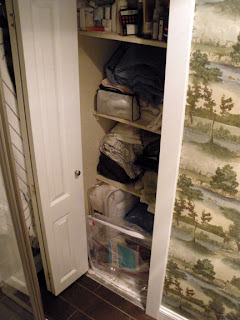
But while we're on the topic of being, ahem, particular about house things, I'd like to move the tour to a few of the salvaged bathroom items. The first is our linen closet, which the picture plainly shows as being in use but not organized. Last weekend we had some friends visiting and they were delightfully amused when they opened our upstairs linen closet and found it to be in slight disarray. Apparently, this shattered the perfect image they had of my housekeeping skills. So ladies, this closet shot is for you. My messy towels aren't just limited to the second floor!
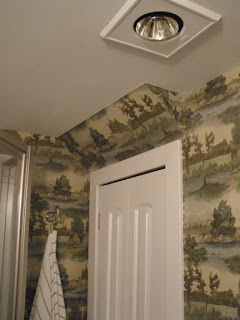
Moving upward you'll see the ceiling light and exhaust fan. Nothing special here other than we reused it and spray painted the baffle white to better blend in with the fresh new ceiling. $3 in spray paint goes a long way with something like this.

The new configuration of the bathroom doesn't really allow for towel racks so we've got some handy hooks instead. Both the towels and the towel hook are from Ikea.
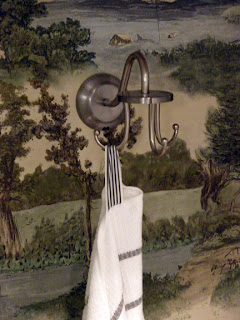
I particularly liked this hook as it reminded me of a fishing lure. You might say I found it a-lure-ing. HA!

As we go to make our way back out the door you can get a glimpse of the wood plank-like tiles against the new carpet. All in all I'd say we're pleased with both of these selections.

But before we close the door on this project (and pack up our fishing gear) let's take a closer look at the wallpaper. Remember my earlier comment about the bathroom giving a slight, if inaccurate, nod to the Civil War? All credit for this realization goes to Angler Matt. He took one good look at the scene above the toilet and said, "The gray coats are on the wrong side of the river! They should be on the south bank! And the blue coats on the north!" Blasphemy! Then again, it's not like the Brits were fighting this battle so I guess we can't blame them for getting it wrong on the wallpaper.

With that, if you're still reading and sipping your tea, I close out this bathroom story. Enormous thanks go to my mom, who practically hung the wallpaper all by herself while I just provided additional paste and held the razor blades. She's a talented gal and we're so thankful to her on this Mother's Day weekend. Go grab your fishin' hats and have a great weekend!

3.04.2010

Basement Part 8: Off the Hook

We're nearing the end of this basement adventure. Matt and I compiled a punch list of the nagging little items left to do and we're hoping to knock them out on Saturday. If we're successful, my goal is to then take fancy, totally stylized and staged pictures to put up on the blog for your swooning pleasure. Or 30-second distraction from work. Whatever floats your boat.

Until then, I thought I'd share the impending design of the bathroom. For such a tiny space this room has consumed a lot of time and brainwaves trying to decide what to do with it. For starters, it's already been painted twice. I know normal people would cringe at the thought but double painting seems to be my M.O. Yes, one could theoretically do the sane thing and buy a few sample pots of paint but that's unsatisfactory for me, I guess. I need the color splashed all over the place in order to ultimately decide I don't like it. So the green-gray went up first and it failed. Then came the blue-gray.

Not bad, right? And hey! The sink is installed! The Anchor Gray is certainly more manly and it surprisingly made the room feel slightly larger. They say dark colors make walls recede; perhaps that's the truth in small spaces. Anyway, as much as I liked the color this paint does not hide flaws in the wall surface. Remember my early verdict about our drywallers being meticulous? I recant that claim now that there's paint up. Frankly, these walls are so pocked they resemble the skin of the Real Housewives now that Bravo is in HD (poor choice).
What's an anal homeowner like me to do? Wallpaper!

That glorious design element from the early 90s is experiencing a revival and I'm about to welcome it with open arms. But what kind of wallpaper? That's the hard decision and my mom and I spent 2 hours flipping through books this past weekend trying to find just the right thing. We failed. It's tough to find something traditional but fresh, funky/trendy enough to be fun but also something that isn't already in every designer magazine (I'm looking at you, "Woods" wallpaper in the bottom middle).

While the wallpaper issue was going on the bathroom fixtures were having a bit of an identity crisis. I think lighting can give such personality to a room and I was struggling to get this one right. Did we want this to be a design-safe, spa-like bathroom? Perhaps. So I tried this light from West Elm.
Pros: wood to balance out the floor, no frills lamps so it could go with a variety of styles, $50 on clearance
Cons: the light it gave off was minimal, the wood tone wasn't the right color, and overall, meh.

Then came an old standby from Ikea.

Pros: $35 price tag, halogen lights are bright, crisp, and can be adjusted to point light anywhere, modern
Cons: it didn't really do much once in place, too modern in the end

At this point I was losing hope and starting to think we'd just pick up any ol' thing at Home Depot and would try to look past the wall imperfections. But then the stars aligned! Behold, our bathroom scheme:

Matt's a fly fisherman. So friends, I give you wallpaper that sports 19th century Englishmen in top hats casting flies in the English countryside. They say food is the way to a man's heart but for my preppy husband, fly fishing wallpaper appears to do the trick. Once I snapped this up from across the pond it all came together. Leave it to the Brits!

Source list:

Sconce - Pottery Barn Kids

Sink and faucet- Ikea

Mirror - Ikea

Basket - Ikea

Wallpaper - Wallpaper Direct

Tile - American Olean at Lowes

Towels - Ikea

Toilet and shower - reused

I'll give a preview regarding the rest of the basement to help explain the bathroom selections. Last Friday, when the carpet was being installed, I was downstairs during the day for the first time in a long time. The room was deliciously sunny and bright. It practically screamed out, "Don't make me a men's den! Give me color!" So I listened and the dark plaids and paisleys are gone thanks to this conversation and a ridiculous sale at Hancock. Thankfully, in addition to liking toile-ish wallpaper, Matt also adores salmon pink. Thus the bathroom is the only thing that is now obviously for dudes. The rest of the basement? Not so much.

2.16.2010

Basement Part 7: Wood You Be My Valentine?

*Heads up! Lots of words, pictures, and links to other fun sites below.*

We're obviously running a bit behind on the blogging here at bschoolstudio. Yes, Valentine's Day was over a week ago but the subprojects shown below were all started last weekend (how romantic!) and I wanted to wait until they were in a photo-worthy state before posting. Now that we've checked a few more things off the list, let's review in this edition of all things wood.

First - Door and base trim. It's in. All 300+ linear feet of it. Last Friday we ended up going to the Home Despot (our term of endearment for Home Depot - fitting on so many levels) and realized there was no way our trusty wagon would be able to legally haul 12' long trim pieces home. Enter the Despot truck rental service. $19 later I was behind the wheel of this beaut.

Forgive me, but I kept referring to myself as "Large Marge" while driving this beast on Chicago's pothole-laden streets. Fans of the 80s, you must know who Large Marge is.
But back to the trim. We treated ourselves to a pneumatic nailer and tank that Matt spied at Sears a few weeks ago. Initially the too-good-to-be-true price tag had me worried. However, it earned its keep in no time and now I am certain that it is a must-have for installing trim. Below is the new (small) door to the half-height closet beneath our front hall. My sewing stuff and fabrics will soon happily reside here.


Turning the corner you get "the money shot," which dutifully captures most of the woodworking that's been going on. Oh yes, those are built-in bookcases. For reals.


Our friend Ann was in town this weekend and dropped by to see our progress. She asked if we were staying on budget and here's where I can demonstrate why we have exceeded our intial estimates. We put in all new doors so we could have the simpler "Continental" style rather than the traditional six-panel design. Instead of using the old shiny brass hardware we installed new brushed nickel doorknobs to match the hinges that came with the doors. The trim is a 5.25" base while the door casing is 3.5" wide. Architecture nerd pals, you know this is an upgrade! Matt was skeptical at first but once the trim was up he was a "bigger wood is better wood" convert, which is also what she said. :) Huge kudos to Matt for installing all of the trim and making it look even when our walls and floors were not.

Continuing around the blue wall bend comes my new desk and sewing area. The skinny white shelves are perfect for holding up pattern sheets, whatever thread spools I'll be using, and other notions. The cubby on the bottom right was sized to hold my sewing machine and serger. Oh, and yours truly built this. By. Her. Self. And, I'm happy to report, it's both sturdy and level, despite the sloping floor. Bam!


In the picture above you can see the left edge of the gas meter/media closet. To the right of it is a full set of bookshelves, which will house Matt's subwoofer and great works of literature (textbooks, glossy picture books, and chick-lit). I'm going to brag again and let you know I built the top half of the shelves, too, using some construction fundamentals found over at Knockoffwood.


I didn't do all of the building, though. Matt laid out the bottom half of these shelves and constructed all of the niche shelves, which will hold his record collection. Notice how the baseboard trim wraps around the bottom shelves throughout? It makes my heart flutter.
And now to wrap up the wood discussion, let's discuss the bathroom tile. What!? you say. How does that go together? Allow me to introduce our new bathroom floor (and nevermind the lingering dust).

The floor is made of 6"x24" porcelain tiles from American Olean's St. Germain line. A sample tile at Lowe's was a cream color and the fine lines on it made that sample look like corduroy fabric, which would complement the menswear look we're after. I prefer a darker floor, however, so I ordered the tile in Chocolate. Unintentionally, the tiles resembled wood planks.

I feared this could be slightly cheesy, like the vinyl flooring throughout my hospital that is supposed to look like rich wood floors at the Ritz. Two days of mortaring, grouting, and wiping later, I think we've escaped the direct wannabe look, in my biased opinion. These tiles evoke wood without trying too hard. Also, I'm going to spare you the installation details because I don't have much new insight to offer in that department. Instead, I strongly suggest referring to Katie's write-up because it's a great tile guide.

I'll 'fess up and admit that here is another example of where the budget may have burst. At $4.50/sf these tiles completely surpassed our original $1/sf expectations. But here's what we've learned in this project - we didn't go to all this trouble (and pain) just to have our basement fall in the "Whatever was on sale at Home Depot last weekend" style file. A bit snooty? Perhaps. I blame my anal, I mean perfectionist, past project managers. And I thank them too because this place is shaping up nicely. The bathroom floor is modern but easy on the eyes. It's masculine without being harsh. The wide base trim gives the little room the heft it needed. The door trim is the same stuff I'd spec for million-dollar homes back in the day AND it matches the original trim we have elsewhere in the house. I love it.

So that's the status of our world. We took last night off to enjoy a dinner out during Chicago's Restaurant Week and to celebrate the 8th anniversary of our first date (cue sappy music). Tonight, tomorrow, and Thursday night we'll be spackling, priming, and painting fools. Carpet comes Friday and there's a lot of wood that needs to be made white before then. Wish us luck!

2.05.2010

Nerdy Excitement

I scored this little cutey at Ikea last night:

It's a big deal because:

1. Our basement bathroom is anything but big.

2. This sink is nowhere to be found online or even when you call Ikea's automated stock check phone number (you'll note that link only shows you the big sink, but ours is a mere 15"x16")

3. It was there, live, in the flesh, which is the most shocking thing of all. A trip to Ikea where everything you want is actually on the shelves is major news. I had to share. Okay, brag.

p.s. It's okay if at first you think it looks a tad like a urinal. I had the same thoughts too. However, I'll argue that that just adds to the whole "men's club" feel, doesn't it?

2.04.2010

Basement Part 6: Covering stuff up

First, thanks for the helpful comments regarding the potential slip-cover project. More on that below.

Next, drywall is in and we're just waiting for all the mud to dry before painting. In the interim, I should be running around with Pledge, dust cloths, and a vacuum but it almost feels pointless. The dust always returns! Our house currently looks haunted the dust is so plentiful.


Bathroom walls are in (and that purple color is a sight to behold).


New family room with utility room beyond. That vacuum got a work-out!


New sewing nook/office area. The desk will go to the right, just beyond the closet door edge you see.

And speaking of that closet door, it is covering up the gas and water meters that we would not move, no matter how annoying it is to have a closet in the middle of an otherwise usable wall. Instead, Matt had the genius idea to put all the media stuff inside and get it out of view. Words cannot describe how happy I am to not see piles of boys' toys all over our spiffy new space. And just so you know, when I took this picture only half of the electronics were inside!

Boys' toys provides a nice segue to that men's hunt club theme from the last post. To cover up the purple and gray sheetrock we're going with an accent wall of Benj. Moore Anchor Gray and an overall color of Dune Grass. I'd show you the swatches but the online versions look nothing like the real deal, so you'll have to wait for next week when we've finished painting.

We're working with our existing couch and the style is just like this one below but the fabric is parchment-colored microfiber. Its pale, neutral shade will definitely help in keeping things from feeling too dark and heavy.

Then we've got the chair and ottoman I was talking about. It's a dead-ringer for this one, color and all:


chair and couch images from jcpenney.com

Lastly, as promised, here's a shot of the loot I picked up Sunday afternoon. The paisley is a low pile velour-type deal, the green/gray striated velvet has an awesome sheen that you can see if you look at the strip next to the selvage, and the plaid/houndstooth fabric is a drapery-weight woven. I realize they probably look really dark, but we all know there are two black labs who will call this room home and their fur is not to be messed with.


Here's where I bring up the chair slip-cover again. Style-wise, I'm not in love with that green chair but it is damn comfy. More to the point, though, it's so cushy and rounded, with all kinds of extra curves that you can hardly see in the picture, that I'm now questioning the value of re-covering it when I know its life expectancy is probably short. The nagging issue? I have 4 yards of the paisley that I really want to use on a piece of furniture.

Today's question: paisley on a more squarish chair (craigslist can probably help me out again here) or on a large ottoman? Plaid on pelmet boxes over our little windows (to give them some oomph) or as throw pillows? I've got ideas as to where to use the fabric but it's fun to hear your thoughts, too!

1.28.2010

Basement Part 4b: Framing Photos

Drumroll, please:
That's a ceiling, with recessed lights and speaker wire for surround sound

Here's the new family room. Note the carpet line cut? That's where the old wall was. Little difference but big impact.
Plumbing and electrical are in. Sewer lines properly vented. Power and HDMI line for tv hardwired into the wall for a pretty wall-mounted tv viewing experience.

Shower basin and walls back in. Toilet flange ready and waiting.

Foam beneath the shower basin for support. It's still expanding...

Boxed-out sewer stack AND bookshelf niche to the side, above the old toilet hole. Yippee! We got to deal with one of those trouble spots in a good way.

Newly expanded utility/storage room. The break in the tile shows where the old bathroom wall was. Finally, room to walk around and store stuff. Gasp!

And last but not least, for my sewing-fan loyalists, the new home of my sewing desk, with the closet beyond that will hold all the fabrics, notions, patterns, etc. Despite the toilet in picture, here's hoping my sewing skills haven't gone down the drain from lack of use (sorry, couldn't help it).
Drywall is coming....

1.26.2010

Basement Part 4a: What We Framed Out


Bad news: I don't seem to know how to operate my camera. See, the framing's been done for a week and I took a lot of good detail shots to show all that went into it. Or at least I thought; my memory card was still in the USB converter when I snapped lots of shots of nothing.

Even though I don't have pretty images to support my claim (I'll take real ones tonight!) there are some interesting annecdotes to share relative to all the wood now in the basement.

1) I got a call out of the blue from my old project manager. Her voicemail was cryptic but said she was having some thoughts about the plan and wanted to review. HA! Total blast from my intern past. This is the woman who drilled into me the importance of alignment, centering things, etc. It later played into the wedding dress project. We haven't connected yet (because of working on said basement) but I'm hoping that whatever she was about to suggest I intuitively did on my own, thanks to her good training. The floor plan isn't exactly as pictured - minor changes - but here's hoping...

2) The amount of framing that now needs to be covered has intimidated us, I admit. Late Sunday night we were doing a big clean-up to make room for laying out plumbing lines and both of us sheepishly raised the white flag on impending drywall. Should we try and get someone to do it for us? And would it be worth it or would we be throwing money out the door?

3) My mom has gotten great pleasure out of the fact that I finally seem to be putting my architecture degree to work. Well, the business degree got some utilization too, in the form of a nerdy - but convincing! - cost/benefit analysis. Behold our solidly estimated cost to drywall the basement ourselves:

Not bad, right? Now here's the kicker. Another Craigslist posting gave us around 60+ responses of guys willing to do the work. Other responses involved asking if I could revise a woman's tattoo, our plumber Pete obviously spamming whatever odd job gets listed, some dudes offering furnaces at 40% off, you get the picture. But we had a few of the more legit guys come by and I am thrilled to annouce we're lined up to have the walls and ceilings covered, taped, sanded, and cleaned-up over the weekend for the bargain-basement (haha) price of $350! SWEET SWEET SHEETROCKING FREEDOM!

The one bad side to this is we have GOT to finish everything that goes in the walls and ceiling by Friday. To my studio friends, charrette has followed me home.

P.S. I love the shout-out to my alma mater in the wikipedia entry from above! So appropriate.

1.19.2010

Basement Part 3: What We've Farmed Out

Heading into this project we were generally uncertain about how much outside help we'd have to call in and if we did need the pros, when and what for? Once we got the old construction cleared out it became wildly obvious that someone (ahem, anyone but us) would need to cut out the old bathroom drain pipes and the nearby concrete so we could put new ones in. Later on it also became wildly obvious that someone (again, anyone but us) would need to put the new drain lines in so, you know, they would actually drain even when they seemed to be going against gravity.

Home Depot rents concrete cutters and of course they have all kinds of plumbing materials. But what they don't rent or sell is the know-how necessary to keep amateurs from causing their house to collapse, either from accidentally digging up the concrete that holds supporting columns into place or from plumbing things in such a way that causes smelly explosions later on.

This left us throwing up the white flag and me quickly putting ads on Craigslist (thank you, Mr. Craig, for your highly functional list!) Within minutes I had too many responses to keep them straight. I think my email account was a great (or sad) snapshot of the times - there are clearly a lot of people looking for work right now. We're not loaded, but thankfully we seemed to have scraped together enough loose change, birthday dollars, and credit card rewards gift cards that we can do this project now AND therefore can benefit from some eager and affordable contractors. If you've got the cash and the desire to do a home project now, I'd say jump on it while all this talent is around!

Anyway, after getting about 3 or 4 estimates for concrete cutting we settled on Jim. Jim's an ex-Union guy who came prepared with all his tools in case we liked his estimate. We did. 5 hours later and with a house reeking of gasoline from his gas-powered saw, we had some trenches!

Jim hauled away the chunks of leftover concrete but there was still a decent amout of dirt/sand around. And the fine dust that mixed with water from his saw? Let's not even go there, except to say sludge was all over the floor and we're still vacuuming it up as it dries into powder. You can see in the picture below the splatter marks on the pipe. That's the sludge, friends. You can also see black plastic tied around the main sewer stack. Jim accidentally cracked the clay pipe when digging, but given that it was probably 80+ years old and super fragile, we didn't stress. Besides, Pete was on his way to put in all new PVC!


Again, we got a few estimates and Pete was the winner so he visited us on Saturday. 6 hours later and this time with a house smelling of nail polish remover (from the flux used to connect the PVC) we had drain lines and vents sprouting from the ground!


During demo we learned that the old bathroom was never properly vented. As a consequence our toilet was very slow to flush and drain. Occasionally, there would also be a slight odor. Not going to all this effort just to half-ass things, we concluded it was worth the extra $150 to have Pete properly vent the new bathroom.

And while on the topic of messy things, let's just finish up the bathroom drains by discussing the concrete needed to fill in the trenches. Matt and I hauled in 840 pounds of concrete mix (and not without first worrying that we were going to bust an axel on our trusty Volvo) and went to town mixing it one half bag at a time. Some tips:

  • Our smoking drills (yes, plural) demonstrated that the egg-beater attachments for drills cannot be used in mixing concrete (it's way too dense)
  • It takes a few batches to figure out the optimal consistency but no need to waste the first few as long as they somewhat resemble concrete - it all gets smooshed together anyway. I only say this because our concrete was not structural.
  • A 2x4 remnant works well f0r further mixing the concrete and leveling out the mix once you've dumped it into place.
  • Wear goggles and a face mask. The dust is unreal and it WILL give you gross black boogers for a few days.
  • Wear long sleeves. When the powder and water first mix, the chemical reaction makes it quite hot and you can burn yourself.

1.5 hours and only 540 lbs of conrete later, we closed up our floor and felt some serious pride!

Careful observes might spy some framing in the background. So riddle me this: what does a 3 day weekend and an untold amount of lumber get you?

Related Posts with Thumbnails