Showing posts with label wedding dress. Show all posts

8.24.2009

Married!

Hello all! I'm back and I've got pictures just as promised. All of the images are courtesy of our amazing photographer, Jack Looney. Endless, endless thank-yous to him for capturing so many special moments for us. And, I can now finally reveal all of the other projects I was sewing or working on in some other crafty manner. Lots of images to follow so head's up!

I suppose we should start with THE DRESS. In short, I loved it and it was so much fun to wear.

It was simple but had some panache with the taffeta and bit of ruffled hem.


This also helped to give a more dramatic silhouette when bustled.


The silk breathed as well as it could in 88 degree heat, with a dash of humidity. The bodice held its form well through the day, despite my fear of skimping on the structure inside.

My only complaint? The damn zipper in the back. If you'll remember this post where I was pleased as punch with my zipper installation, you may be wondering what went wrong. Well, here's the rule for all those working on wedding dresses: leave it alone! It is more likely to be right the first time. I embarked on minor alterations about a month before the wedding because I was worried the waist band was just a tad snug and therefore not allowing the dress to truly hang on my shoulders. WRONG. That zipper never laid the same way again and the back two panels had minor (but noticable to me) wrinkles from the fabric pulling. I really don't know what happened when I put the zipper back in but it was never the same. ARGH. So, as much as I loved the back of the dress, I prefer the pictures of it from a distance.


So on to the other handmade items. First up is my hair piece, which I cannot take credit for but will rather give to Lulusplendor on Etsy. When you can't make it yourself I swear that site is the next best thing. (See what I'm talking about with the wrinkles on the butt? BLECH. Thankfully the nature of the taffeta helped disguise that a bit.)

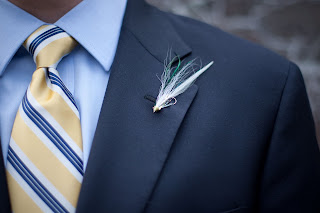
The feathers in the fascinator also worked quite well with the boutonierre's Matt made, to give a nod to his beloved fly fishing.


As you can see, the guys wore navy blazers and white linen pants, which worked quite well with the table runners I whipped up days before the event. The fabric came from IKEA and in a brief moment of lapsed judgment, I had planned to actually cut and hem all 18 of these babies. Then I remembered the pinking shears - deep sigh of relief! Those things are worth their weight in gold, despite the small blister I got on my finger! And the make-your-own-table-runners is a good tactic for avoiding extra cleaning fees from the linen vendor if you have tall, drippy candles like we did.
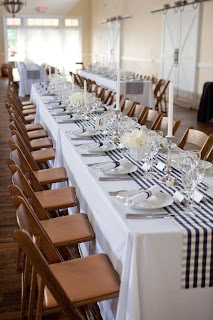

Let's go in for a closer look, shall we? Because then I can finally show you those favors I mentioned more than once! Together Matt and I made cotton webbing key fobs and used about 8 different kinds of jacquard ribbon. Though we were intentional in our original assignment of the favors, we later discovered there was a secondary market for them and people were bartering for different ribbon patterns! They were a crowd pleaser and I particularly liked that we could incorporate them into the table setting as napkin rings.


And as for my two favorite munchkins, here is the flower girl in her dress (which she loved to twirl around in because it was long, I later learned) and the junior groomsman in his scaled-down tie. (Aren't these fun pictures? The photographer set up a photobooth of sorts and people went to town after all the serious stuff was over!)


To close up this discussion on all things handmade, here's a shot of our wedding programs. This little project morphed into a big one, as I added more things to the packet. Inside was a list of the wedding party, the dinner menu, the seating arrangements, and a thank-you note to all the guests done with a bit of humor. I liked the programs because constructing them kept me busy on the 12 hour drive down to Virginia, while the guests liked them because they kept them busy waiting for the show to start!

And so that about does it for us. Now that I'm hitched, what's coming down the sewing pike? HOUSE STUFF! Curtains, bedding, and all other fabric finery is in my future. And perhaps a little cocktail dress for my friend's upcoming nuptials.
P.S. If you want details on how anything was made, just ask! The post was just getting a tad long...

4.02.2009

It's Done!


The dress is done! It's actually been finished since Monday but that was the very same day that spring quarter kicked off and it did so with a vengeance. The weekend is poised to be equally busy so I thought I'd squeak this in now despite the chance it will probably be a shorter post. Also, I'll just say now that I don't have one overall great photo of the dress. The need to clean up the sewing room and get the dress put away safely, on top of no good place to stage a photoshoot, precluded me from getting any "ooh" or "ahh" -worthy pictures. I suppose you'll have to wait until August!
Below are a bunch of detail shots. Putting modesty aside for a moment, I'm pretty impressed with that back zipper and the trim. If you could lift up the zipper pull you'd see that the trim pattern is perfectly matched and the three bars seen on the far right meet up just so at the middle, too.

The skirt hem was embellished with small bugle beads that match the waist trim and neckline. I spaced them about ever 3/8" after first trying to get a continuous line of them, then realizing I would be bald on my wedding day from having pulled all my hair out in the process of beading! The other hem shot shows construction details: 1" horsehair just above the bead line, then the stitch line of the ruffles, then 1/2" horsehair on the skirt hem to finish it off, and lastly a narrow hem on the ruffle band.


And lastly, two looks on the inside. The monogram made it after all! I used it as a small patch to then stitch the tulle band together at the center back seam.

Finally, there will be no garter toss at this affair. So for a glimpse at the underside of the dress, here you go!

It feels great to have completed the dress. I'm really thrilled with it and it does give a huge sense of accomplishment and pride. However, I'm also relieved to put it in a garment bag and move on to the millions of other tasks! Next up is the flower girl's dress and possibly a suit for the ring bearer, but that depends on what get-up Matt selects for the gents. I've had a ton of questions about wedding theme colors and didn't have an answer until about a week ago. Then, while trolling some favorite sites this week, my choices were confirmed as "my colors" were all over the place, and in some fabulous applications! See if you can figure them out (it shouldn't be hard):

from http://www.swsmag.net/

from http://www.dressaday.com/dressaday.html

from http://www.thisyounghouse.com/

There are some cool fabric samples in these colors strewn about the room but I'm just too lazy to scan them in to share. Check back later!

3.25.2009

Wedding Dress Wednesday - #8, Part B

**Thanks to the commenters from Part A's post. I tried using a dab of saliva and it helped a little but there's still a slight spot. I think I'm going to leave well enough alone!
Okay, I'm back as promised! This will be a picture-loaded post so make a cup of tea or something and settle in for a bit.

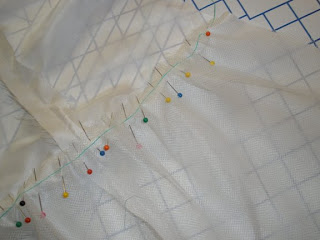
First up, the tulle added to the skirt lining. I cannot remember where I read this tip but some brilliant woman suggested using dental floss as the gathering thread with tulle. Sheer genius. You can see Johnson & Johnson's finest mint-flavored product strung through the material. To my friends going in to brand management, take note: yet another use for a basic beauty product.
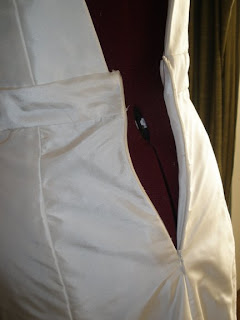
Once the lining was assembled I finished the bottom with a narrow hem and then attached it to the inside edge of the bodice. Next, the invisible zipper. It took a little tweaking but overall it was in with relatively little pain. I cannot stress how important it is to baste everything before sewing on the machine. You save yourself a lot of ripped up seams particularly with a zipper where you're trying to align seams, like on my waist band.


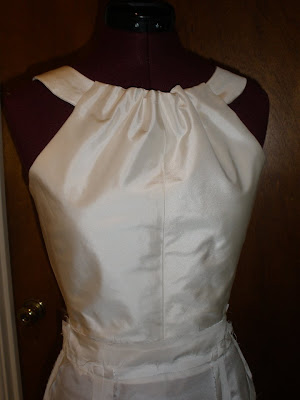
After that I decided it was time to permanently set the neckline gathers. I did a test run with a basting stitch, which looked fine but admittedly bland. I've got some trim options for the waist band (a hint of things to come) so I busted out some silver seed beads to match and added them to the neckline. They provide the perfect spacing for the gathers. And, I get a little sparkle on a dress that otherwise cannot accomodate a necklace.

At this point you are probably thinking there's not much left in the way of major construction, and you would be correct! So moving further down the dress it came time to tackle the hem. The last few days have been filled with me tacking on various trims and scraps of fabric to liven up the bottom of the skirt. For those who have been following along, I'm sure you've picked up my yearning for an interesting, textured skirt. Of course there was also the tendency of over-doing it.
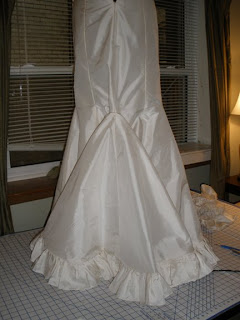
I think I struck just the right balance of "unexpected surprise" meets "oh yes, that completely makes sense with the rest of the dress." Thus, the pressed ruffled hem. I emphasize pressed because before the ruffles met the iron they had an uncanny resemblance to a bad bed skirt. Smashing them down solved that and gave it an edgier look to me, which is somewhat difficult to capture in the picture, admittedly. It needs one more round of ironing to really set them but I still have to finish the skirt hem underneath so that will wait.

And since the zipper is in, the center back seam is stitched closed so now you can get a feel for the bustled train. A hook and eye is still to come but thanks to the wonderful stiffness of taffeta, you can get a preview by just pushing the fabric into place!


If there's any tea or coffee left in your cup then finish the last drop with this parting picture: it's almost there...

Wedding Dress Wednesday - #8, Part A

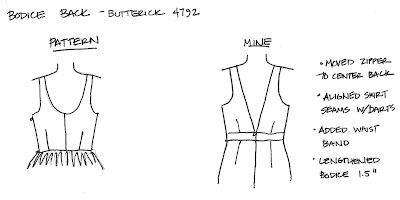
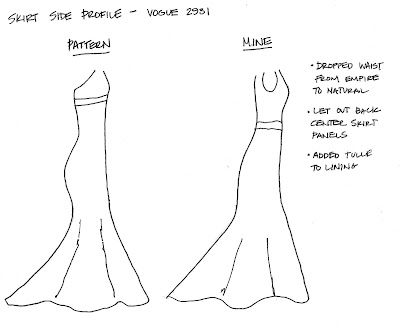
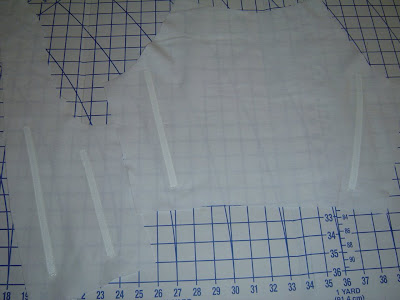
Following last week's post I got a question about what patterns I used to make the dress.
And now some masterful drawings to illustrate what got changed and where:


I've been quite busy over here working on the dress because I have to clean up our back bedroom for some houseguests this weekend. The place is a disaster with a capital "D" and yet so wonderfully reminiscent of the architecture studios from college. To this day I contend good work is stifled if you constantly have to tidy up!

The room has also been declared a no food, no drink, no dog, and no man zone following an incident last week where I left the dress out unattended and Matt came home, only to see it in plain view. Damn. So much for that tradition! I also had a scare yesterday when I tried on the dress right after getting out of the shower in order to check hem length. My intentions were good: shower fresh with no lotions or potions to spoil the fabric. Unfortunately, my razor was not. A small unseen knick on the back of my leg left a few drops of blood on the dress. You can only imagine my horror upon discovering this, I'm sure. Thankfully it was contained mostly to the underlining (I heart underlining, by the way) and I was able to do damage control. There is the tiniest spot on the outside of the dress but I am hopeful no one but me will ever notice. Plus, a pre-wedding dry cleaning might make this all moot. I hope. Please. For the love of God.

Anyway, the place is a mess because there's been a lot of good work going on. I will post more today with dress pictures during dog nap time.

3.18.2009

Wedding Dress Wednesday - #7


Phew. The skirt panels are sewn together, both by machine and then by hand. I've learned to never underestimate how much catch-stitching needs to be done. The picture above was taken before all the seams were properly pressed back and stitched down, and before the skirt was actually attached to the bodice. Those tasks are now done, and the fit is still good!

Speaking of fit, I've also learned how helpful it is to baste major pieces together to check the fit before sewing them on the machine. Since this is taffeta it's not forgiving when it comes to hiding holes from removed stiches so I've been extra careful to make sure I'm sewing a seam once and only once.

There's not much else to say this week, except that I'm at the point where I'm unashamedly going to take full credit for the design of this frock. As I've put the real deal together I've realized how little of it follows the original store-bought patterns. Sure, it's got hints of a Vogue and a McCall but it sure doesn't match any of their pieces!
My fancy machine is officially on the fritz but my trusty $90 Brother is turning out to be a more impressive substitution than expected. It's the little machine that could! As long as it continues to behave I'm going to get the lining in and then the zipper. After that, some hemming and trim detail. It can't do the nice automatic buttonholes, however, and that is precisely what's holding me up from finishing the green spring jacket.

3.11.2009

Wedding Dress Wednesday - #6

What we have here is just one of countless seams that has been pressed open and catch-stitched into place. Talk about climbing the learning curve quickly: before this dress I had only hand-sewn the sloppiest of hems but my portfolio of stitches has probably quadrupled in the last few weeks.

The other portfolio that has diversified, if you will, is my collection of sewing gadgets. First, I got a ham a few weeks back and that swiftly earned its place in the sewing closet. I used it to press all the seams open since I've learned in fitting this dress that I don't have a straight edge on my body, so why press on a straight surface? Next, I finally found some rigilene boning only after I had made the foundation with the normal thick plastic stuff. No matter, I was convinced in seconds that this is what I needed for better construction of the bodice. I attached it to some lightweight cotton flannel, which then got basted to the front layers of the bodice (the bodice is lined with the same fashion fabric, not a seperate lining).


This means that the foundation with monogram did not make it into the final product, as suspected. I think you'll agree that that was a good sacrifice to make. There is no way I could have gotten as smooth of a finish had I been stuck attaching the (bulky) foundation.


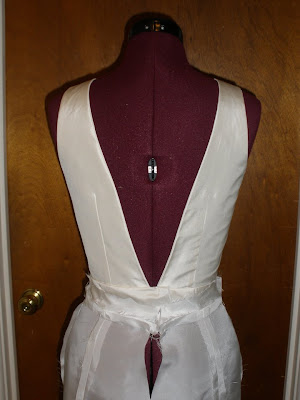
So the top is about 97% there - I need to fully stitch the gathered neck line into place so that it's tighter and more uniformly scrunched, so to speak. But I like this shot because you can see the nice sheen that the taffeta has. And as for the back, the V will come to a clean point at the waist band once completed. I didn't feel like pinning everything perfectly into place for this half ass photo shoot. Let's scroll down for the last bit of progress:

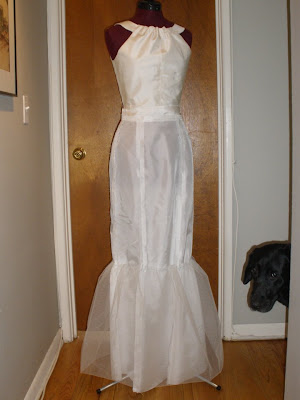
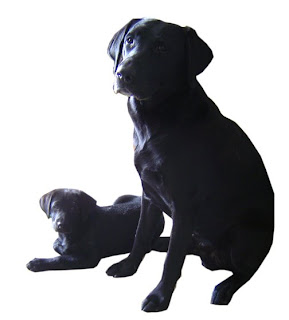
Say hi to Hudgins, the black dog I don't have to worry about around a white dress. You can see the lining here and some tulle pinned to the bottom. I'm going to sew the top layer of the skirt next and want to see if it needs some oomph from the tulle or if it will have enough body on its own.

And as for the monogram, I'm still looking for a home to give it. I tried stitching it to the top of the skirt lining but my machine was not happy about that proposition. Danger, Will Robinson. Three times. I swear that machine is so finicky and the moon, stars, and planets have to be in perfect alignment in order for it to work. Today was not that day, apparently.

3.05.2009

Wedding Dress Wednesday, umm Thursday

Just days ago it was 20 degrees outside and I had a hard time grasping the fact that the wedding is now less than five months away. All thoughts I have of the wedding typically focus on how to not sweat to death in the August sun yet hot sun seemed all but a distant memory...until today's glorious 60 degree weather. Spring, you're out there somewhere. For now, though, you're just the subject of a delicious beer enjoyed tonight.

Anyway, wedding dress. Where were we? Last we "chatted" I had basted all the underline to the taffeta. I've now stitched the lining together. Given that only the skirt is lined this wasn't really a major stepping stone. But so far it fits so that's a win!

I also constructed the foundation with some light boning and some sew-in bra cups. I don't know if this get-up will actually make it into the finished dress. The muslin I made was pretty complete and it didn't seem to need this level of additional support. My only concern is keeping the deep V back panels in place and some boning could do that if needed. So we'll see. But for now, some details:


I did not include a waist stay since the foundation isn't the only thing holding up the dress. The halter straps will do most of that work, thankfully. Here's a shot of the inside of the foundation, folded so you can see the boning on the innermost layer and the bra cups sewn to the other.

If it makes it to the party, the foundation will be attached only at the underarm and back seams. Then the fashion fabric is self-faced and will be layered on top across the bust line. Like I said, we'll see. But now for the fun stuff: a monogram. Once the computer and sewing machine were getting along I did some test runs to get the "something blue" into the dress. Round 1:


It's hard to tell from the picture, but it was too big. It was also trying too hard, if you know what I mean. So I shrunk (and toned) it down to get this:

And it happily resides on the inside of the foundation to the right of the back center seam.

Let's be honest, this little darling is 90% of the reason I'd keep the foundation in the dress. And if it doesn't make it, you can be sure there's a monogrammed tote bag in my future.

2.22.2009

Finally...Well, Almost

So not only has this week been rough because of that calendar shot below, but it's been rather tumultuous on the personal side too. I'll spare you the details, but there's a pretty stellar condo on the line right now and after 7 rounds of seller/buyer (them/us) price negotiations, a positive (but not free) home inspection, and surprisingly encouraging mortgage talks (in case you haven't heard, credit is now tighter than a pair of Spanx) it might just be these two that kill the deal for us.

Or rather, the simple fact that there are two of them and not just one. Damn the dog haters of the world. And for those of you with both a dog and a house (not a condo), I can only imagine how wonderful it is to not have some stranger deciding how many pets you are entitled to owning.


ARGH. Anyway, amongst all of the craziness I turned to some reliable therapy: sewing. The CAB dress is almost done. I had the same issue as Emily did with the empire waist gathers where both pieces were just too long. Not a big deal though; I just reset the gathers and trimmed them up but you can see that they extended about 1.5 inches past the center seam.


I was all ready to put the zipper in when I realized I had no black ones in my stash. In the meantime I did some strategic tacking on the dress to make sure pieces laid correctly, like the neck ruffle and the front gather on the skirt. Pictures to come.

And lastly, I did some major hand stitching here:


Yes, that's right kids, your eyes do not deceive you. I finally basted all of the organza underlining pieces to the taffeta. The wedding dress is officially underway. If this condo thing continues on at this rollercoaster pace I'll likely have the white frock finished in no time!

2.04.2009

Wedding Dress Wednesday - #3

There is a blissful quiet in my house right now. Namely, because of this:

Charlotte's only been here for about 5 days but she's already earned herself a few nicknames. The first is "little monster," and that probably needs no explanation. She's taken a liking to eating clothes as one of her pasttimes.

The second one is "Pudge" which also needs little explanation if you've seen the pictures of her belly. I'm partial to Pudge because "Hudge & Pudge" has a nice ring to it, particularly when "Hudgins and Charlotte" takes too long to yell out when trying to get them to behave. When did I turn into a mother of two?

Anyway, back to the dress, since it is a Wednesday and all. Last Friday I cut the fabric - everything but the cotton that will make the foundation. Since I can cut that on a little table, and since my hands were killing me after the taffeta, organza, and china silk, I threw in the towel and will do that later. All told it took 8 hours (!) to cut all 42 pieces (!!), despite having my dining table in the living room so it could be fully extended to 10 feet.


There really was no way to lay out more than one piece since I was using genius pattern weights (knives and forks) instead of pinning and the table's only 32" wide. The weights saved time but the tradeoff was doing it one piece after another. I now have to start attaching the underlining (organza) to the taffeta, and that will most certainly have to wait until another nap time happens around here.

Lastly, the CAB dress is coming along though you wouldn't know it from any pictures. The bodice is done, all 48 instruction steps! And now I finally get to start on the skirt, but again, at nap time.

Related Posts with Thumbnails