
Okay, I'm back as promised! This will be a picture-loaded post so make a cup of tea or something and settle in for a bit.
First up, the tulle added to the skirt lining. I cannot remember where I read this tip but some brilliant woman suggested using dental floss as the gathering thread with tulle. Sheer genius. You can see Johnson & Johnson's finest mint-flavored product strung through the material. To my friends going in to brand management, take note: yet another use for a basic beauty product.

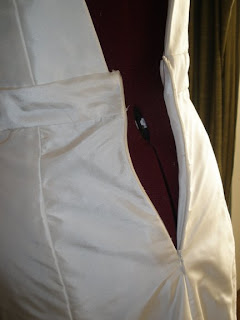
Once the lining was assembled I finished the bottom with a narrow hem and then attached it to the inside edge of the bodice. Next, the invisible zipper. It took a little tweaking but overall it was in with relatively little pain. I cannot stress how important it is to baste everything before sewing on the machine. You save yourself a lot of ripped up seams particularly with a zipper where you're trying to align seams, like on my waist band.
After that I decided it was time to permanently set the neckline gathers. I did a test run with a basting stitch, which looked fine but admittedly bland. I've got some trim options for the waist band (a hint of things to come) so I busted out some silver seed beads to match and added them to the neckline. They provide the perfect spacing for the gathers. And, I get a little sparkle on a dress that otherwise cannot accomodate a necklace.

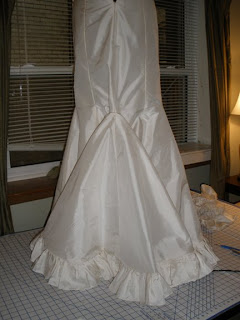
At this point you are probably thinking there's not much left in the way of major construction, and you would be correct! So moving further down the dress it came time to tackle the hem. The last few days have been filled with me tacking on various trims and scraps of fabric to liven up the bottom of the skirt. For those who have been following along, I'm sure you've picked up my yearning for an interesting, textured skirt. Of course there was also the tendency of over-doing it.
I think I struck just the right balance of "unexpected surprise" meets "oh yes, that completely makes sense with the rest of the dress." Thus, the pressed ruffled hem. I emphasize pressed because before the ruffles met the iron they had an uncanny resemblance to a bad bed skirt. Smashing them down solved that and gave it an edgier look to me, which is somewhat difficult to capture in the picture, admittedly. It needs one more round of ironing to really set them but I still have to finish the skirt hem underneath so that will wait.

And since the zipper is in, the center back seam is stitched closed so now you can get a feel for the bustled train. A hook and eye is still to come but thanks to the wonderful stiffness of taffeta, you can get a preview by just pushing the fabric into place!
If there's any tea or coffee left in your cup then finish the last drop with this parting picture: it's almost there...

Your dress looks absolutely beautiful! I desperately need to get mine started and I think you've just provided me with the right amount of motivation! I certainly hope that mine turns out as lovely as yours!
ReplyDeleteThis is stunning, I am completely amazed! I found your blog through PR and went through all the wedding posts to see your process...Crazy impressive!
ReplyDelete