Showing posts with label Simplicity. Show all posts

5.03.2010

Baby Rompers, Indeed

I mean really, aside from Kate's emailed comments about snap tape being used for tear-away pants (genius and terrifying all at once!) what else would you put snap tape on aside from baby rompers? So ladies, bravo for zoning in on that pretty quickly!

Is that the surprise then? A bun in the oven? Yes! But here's what mine looks like:

Empty!

Then what was I doing making baby rompers? They were gifts for our friends in town for the reunion this past weekend. Since these friends, J&P, occassionally drop in on the blog I had to keep the project under wraps until they opened the package. J&P just learned about 10 days ago that the kid in the making is a boy, leaving yours truly with very little time to whip up some outfits.

The patterns of choice this time around were both from Simplicity, 4711 and 2459. And I'm really sorry, but this is the only picture I have of the finished products (courtesy of J&P). Things were hectic last week and I was literally sewing on buttons and closing up seams on the El ride down to brunch, where I planned to give these to the parents-to-be. So put on your thinking caps, y'all, and imagine the following:

- nice summer-weight cottons in gingham, classic white, and plaid (which, tragically, I didn't even have the time to align perfectly....sigh)

- overalls sized for 1-3 months, plaid romper sized for 9-12 months

- serged finish seam edges (j'adore)

- tiny baseball and bat buttons for J, who is a big Cubs fan, and little yellow ducks in a row

- snap tape for the legs. Having used both the cloth twill-tape style with metal snaps and a nylon tape with plastic snaps, I'd recommend the former.

All in all I'd say these were good patterns to work with. Both of them are patterns with a basic foundation and lots of little options. You're left digging through the instructions at various points and that was mildly annoying. Yet once I finished the gingham overalls the romper went together much the same.

I've made baby clothes before and if you haven't gotten a strong indication of how much I love having a serger, I'll yell it from the rooftops.

It's marvelous!

When I whipped up some corduroy overalls years ago I wanted finished seams. Really my only option was french seams and any of you experienced sewists out there can probably imagine how thick they felt. Baby clothes, being a small as they are, don't leave a lot of room for bulky seams and the like. And when you're likely going to launder them a bazillion times it's swell to know that the seams won't unravel in the wash. I don't have munchkins of my own but I made a modest teenage living by babysitting (and simultaneously folding rompers) so to me, ensuring durability was key.

Anyway, we've got a handful of other friends who are preggers so I plan to make some of these again in the future. I promise to take more pictures the second (and third and fourth...) time around.

3.30.2010

Made It Monday: Simplicity 2728

Sound the alarms. I started, finished, and am wearing a garment. It ain't perfect (um, two button holes for one button because I put the first button hole on the wrong side - who does that?) but it'll do.

In an effort to provide images of what things look like on the body, I braved 40 degree temps and utter embarrassment. You're welcome.

This shot was captured at 7:04am and I surely entertained my neighbors as I ran back and forth between camera and brick wall. No need to tell me I shouldn't quit my day job to become a model; I've got miles to go on striking a pose.

Outfit consists of some sort of weathered black jean-ish trousers from TJMaxx, white tank from Old Navy, gray ballet kitten heels, pearls (standard), and Simplicity 2728. I kinda dig this "study in neutrals" I've got going on. Sure, it's casual as compared to my normal work wardrobe but I like the feeling of warmer weather that it suggests.


Now to the question and answer session.

Pattern Description and Sizing:

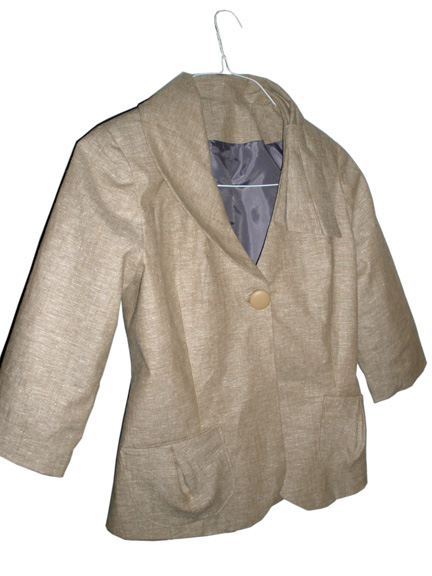
Project Runway jacket with sleeve and collar variations. Regular sizing schedule and I made a 10. I normally make either 8s or 10s in Simplicity so I'd say the measurements were accurate and there's not too much ease to mess things up. I made absolutely no alterations to the fit.

Fabric Used:

A linen chambray from Hancock. It's a good neutral color and the thread named "nutmeg" is a perfect match, so it runs on the warm/pink side of browns.
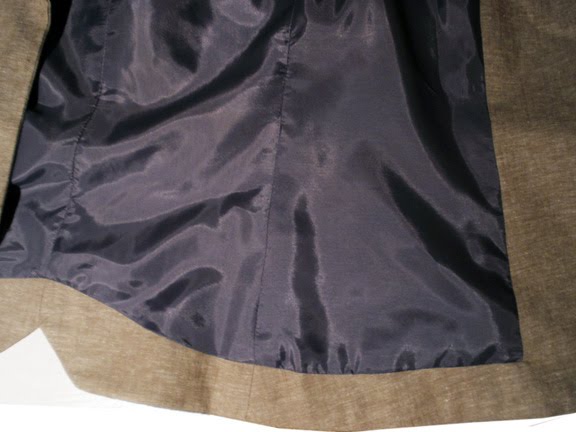
The lining is a lilac poly found in my stash. I love using up stuff that has been sitting on the shelves.


Did it look like the photo/drawing on the pattern envelope once you were done sewing it?

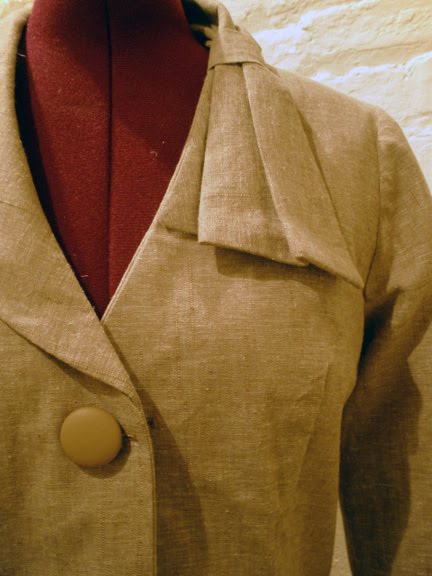
Generally, yes. The envelope doesn't show the particular combination I chose (bow collar, 3/4 sleeves with no extra adornment, pleated pockets, no back buttons) but you get the gist.

Were the instructions easy to follow? What did you particularly like/dislike about the pattern?

Uber easy. In fact, they're probably unnecessary. Though totally unusual for me, I actually liked constructing this jacket more than wearing the finished product. The pattern is very well drafted and the pieces come together in a very logical fashion. I also really liked the continuous facing on the inside of the jacket. The result is a neat and tidy marriage between lining and fashion fabric, crisp inside corners and all.


If I had to pick one thing I don't like about the jacket it would be the proportions of the collar. I can't quite explain it but now that I'm wearing the jacket, the bow feels a little off. Like it's too small, starts too high, ends too short, I don't know. It just seems a bit out of whack.


Pattern alterations:

Since this pattern package comes with so many "designer additions," as the PR series calls them, I can proudly say I restrained myself and made this little item straight off the paper. Oh, but I did tack down the outside edge of the bow to keep things in place and that was not suggested anywhere in the pattern.

Would you sew it again? Recommend to others?

Pleased with the overall fit and in love with the construction process, I will likely sew this up again with a different collar and sleeve style. There's something subtly feminine about this jacket so it's a nice addition to the otherwise suit-heavy work wardrobe. It's a perfect jacket for those looking to make something a little more interesting than most of the stuff that's in the "easy" category.

Conclusion?

I give it a 4/5. It's wearable, washable, and most importantly, a finished item. The hardest part of getting back into anything is starting up, right?

3.24.2010

WIP Wednesday: Jacket!

First, if you are able, please view a few seconds of this clip:

http://www.hulu.com/watch/19681/saturday-night-live-suze-orman

Did you hear the part about the "jaaaaaaacketttss!"? Yeah, this is what runs through my head any time I think of starting a jacket! project. Ms. Orman might be giving swell money advice but other decisions appear to be more questionable. Surely that clip helps validate my hesitation, no?

So anyway I'm fighting desperately to get back any shred of sewing talent I had in the garment department. The pattern du jour (literally, I seem to start - and throw away - one almost every day) is Simplicity 2728. Despite the aforementioned jacket! worries this item won out because fit problems in jackets! can usually be remidied without throwing a fit, if you will.

Survey says....undecided. Construction has been easy. Material presses really well, despite the evident wrinkles that suggest otherwise. I'm using a linen chambray from Hancock in a versatile neutral. And, um, that's all I've got to share so far. Unintentionally this week's design theme appears to be "bows." If next week's theme shows up as "scrunchies" I forgive you for discontinuing your subscription.

Ooooh! Before I go, how's this for follow through?

Matt saw me assembling my lunch the other day and asked if I was making a grown-up Lunchables. Charming grade school association yes, but these Lunchables don't have mystery meat as a star player (no offense, my friends at Kraft).

2.16.2010

Are They Really All That Amazing?

My guest-blogger-to-be is currently driving across our fair country on her way to a new job in Jersey. Needless to say, it's a bit difficult to write a blog entry when you're supposed to be driving. So we'll get her pattern review when she lands in the Garden State, no doubt. In the meantime, a round of applause for Ann and her new job in this bleak economy!

In other sewing news I managed to pick up a few patterns last week during a Presidents' Day sale at Hancock. They're all from Simplicity's "Amazing Fit" line and this is one of the three that I got:

As we near the end of the basement reno (built-ins are being built, including my sewing area!) I'm starting to plan for some spring work wear. Before I get all excited about this lofty promise of an amazing fit, though, I want to know if this Simplicity line lives up to its title. Does the fit of these garments really leave one amazed?

6.15.2009

A Place For Everything, and Everything In Its Place

I think you'll agree with me on this one. Attempt #2 for the proverbial "last dance" is clearly the winner. And because the pictures don't do this one justice I will be sure to post some Thursday following the event.


Let's review the garment, shall we? The styling of this dress is about as simple as they come: 7 panel, princess-seamed dress with strapless neckline. In short, a column gown. I used this pattern from Simplicity for most of the construction but added an empire waist seam to gain better control of the bust line fit.
The fabric du jour is a somewhat loose weave linen/cotton/mystery mix from Vogue's "summer assortment" section. The tag said "assorted fibers" which is always fun when trying to gauge how it will perform in the wash and on the body. I pretreated it by washing and drying because my hope was to keep this casual enough for vacations, and thus, standard laundering. So far, so good.
Below you'll see a close-up of the pattern and one dress piece turned right-side down in order to match it up correctly for the opposite side. Whenever doing a garment in a complex pattern like this I strongly recommend cutting one piece at a time; do not try to fold the fabric over in hopes of saving time! Even here you can probably detect how much shifting is going on because of the looser weave. All in all I'm digging the degree of matched seams on this baby, particularly given the number of seams and the intricacy of the fabric print. The side back seams were where I decided to let things slide when I realized something had to give, somewhere.

The inside is lined with some of my extra china silk leftover from the wedding dress. In an atypical move I completely closed off the interior of the dress; the bottom of the lining is enclosed by the fashion fabric hem instead of just falling separately. Sometimes this can spell disaster if you don't let the two fabrics fall naturally and manage to keep them even as you pin the hem. Fortunately I kept disaster at bay this time around!

And now for the magic in this thing. I am almost certain that if I am ever photographed wearing a strapless dress, there is a least one picture of me from that event where my thumbs are in my armpits and I'm hoisting the thing up in a desperate attempt to keep everything in its place. It sucks and does not produce pretty pictures. Enough was enough! This dress has a 3/8" band of elastic all around the top of it, added almost as an afterthought, but it may now be a staple of my sewing toolbox. Ralph Lauren has his pony, Tory Burch has her funky Ts, and yours truly has her elastic neckline. Not nearly as glamorous but then again, neither is having your thumbs in your armpits.

The picture makes it a little tough to see, I realize, but all you need to know is I used the seam allowance from the top seam to then make a casing for the elastic. Voila!

We're going to return to our past regularly scheduled program of Wedding (whatever) Wednesdays this week, and perhaps a few more after that. I've got some tiny little things to finish up here and there on my dress, the flower girl's dress, and some day-of decor. Stay tuned.

6.04.2009

Uneventful Dress

The title of this post is somewhat misleading but really appropriate! A few weeks back I found this great, lightweight black cotton fabric with embroidered with gold thread in a paisley pattern, topped of with some clear sequins. From that description it might sound like a hot mess but it really was beautiful on the roll so I snatched some up in hopes of a simply styled dress for my last Kellogg ball (tear...).

I got it home, searched for a pattern in the files, and came up with one from Simplicity that I think is from their "lost" collection, if they have such a thing. I've scoured the internet for a picture but cannot find one. It's a basic sundress pattern with different hem line lengths. Because I planned this dress to be for the ball I went with floor length after I added a good 6 or 7 inches, since the longest version in this pattern fell to about 3 inches above the ankle. Here's what that gave me:


Careful readers will note something wonky with the left side of the skirt: that is the back side panel that has already been cut to knee length! As soon as I got the front stitched up I realized that this dress and fabric were not going to be cute as a casual full-length dress (which, upon typing that, I realize is an oxymoron of sorts). So I sliced off the bottom, finished the frock, and got this:


The back does zip all the way to the top, just not on my dress form, apparently! I like the tied neck straps - they keep this casual despite the sparkly fabric.

Aside from cutting the skirt length, I made some other semi-drastic changes to the pattern. First, I fully lined the dress on account of the fabric being almost gauzy in weight. I also just prefer to have most dresses completely lined. The bodice is done in a cotton sateen to give it some structure and because I've learned that fabrics that will be close to the body are better when they're of the natural variety, particularly in summer dresses when the heat is on! The skirt is lined with a poly lining from Hancocks; no big whoop.

Other modifications include my usual invisible zipper rather than standard and adding horsehair to the hem to keep the crispness of the line and to give some body to otherwise flimsy stuff. I was really pleased with that decision, and you can see it if you look closely at the bottom left of the overall photo.

Conclusion: a fun summer dress for nice nights out but not the one for Cinderella's last ball. Attempt 2 is currently sitting on the cutting table...

4.27.2009

Kids' Clothes - Part 1

As promised, I'm back with a post about the flower girl's dress (or dresses, as it turns out). You'll notice that this post is titled Part 1, implying there will be a Part 2. Right you are! That will come tomorrow.

Anyway, I've got two sundresses for the staring darling and I'm pretty happy with both. First, some explanation as to why there are two. Long before I settled on bridesmaid dresses or any other wedding day colors I found a bold crunchy taffeta home dec fabric that I just adored. I quickly snatched up enough to make a dress without a care in the world if it would ever get a place in the wedding; I just wanted to see the fabric come to life in some way. So, here's #1. It's brought to us by the out-of-print Simplicity 8610 pattern that I can't even find online (sorry!):


Nevermind the fuzzy photo - check out those matched seams!

The dress is fully lined in a carnation pink polyester china silk with invisible zipper.

Fast forward about 4 months when I finally, if somewhat hastily, settle on the color for the 'maids. As mentioned, it's a variation of teal and has the amazing ability to make dress viewers yawn when it's on the hanger but then suddenly wake up when it's being worn. In short, seeing is believing with this dress. Since everything else in the wedding is either gray or ivory I really thought for an instant that the flower girl could still wear the checked dress and all would be swell. Not so much.
This led to me looking around for both a color that would complement the teal and a fabric that would be appropriate for a mid- to late-summer wedding. Enter buttercup yellow with white stripes (and cue looks of disbelief from anyone who knows me and is aware of my typical aversion to yellow). I found a remnant at Vogue and thought I'd give it a try. Dress #2 is from Butterick 3762 with absolutely no extras on it (collar, sleeves, pleated waistband - nothing).

This dress is not yet hemmed because I'm waiting until we go to Virginia in a few weeks and the flower girl can try it on. Everything else is complete though. The sash loops were done with embroidery thread in white because I am assuming that the teal sash will be exchanged for a white or yellow one post wedding soiree. You can probably tell that dresses 1 and 2 are virtually the same style but 2 is longer. Again, depending on the "fitting" next weekend I will hem it just a little or several inches!
So what to do with #1? I'll be passing it over as an option for the rehearsal dinner. I'm certainly not one to dictate what the wedding party must wear for two days but I figure, hey, it's made and I sure can't get any use out of it!

12.19.2008

Checkmate

Four weeks off at the holidays is a fabulous perk of grad school and I've made sure to enjoy every second of it since this is surely my last "winter break." So in my neck of the woods it's been a snow storm and a sew storm (ha). I decided it was time to tackle a wardrobe staple: the blouse.

I've passed over many a great shirt pattern because I thought they were too intimidating. Perhaps it's because I think they're fairly susceptible to appearing "home sewn," as Michael Kors often sighs on Project Runway, and no one wants that!

Nonetheless I pulled together a mix of pieces from Simplicity 4077 and used some fabric I got from the remnant room over at Vogue. The ruffled front reminded me of a shirt I saw at JCrew in the fall but I was not willing to shell out seventy clams for it.


This isn't quite it, as it's a tad lumberjack-y, but you get the idea...

And now my version:

In making this I've learned that shirt construction is not all that hard; it's the finishing that makes or breaks a garment like this. I did not serge the raw edges because I still haven't sat down to figure out how to work the thing. Instead, I used french seams almost everywhere and some bias tape on the front darts and cuff seams.


I think the total cost on this project was about $6.50, which beats the sale rack any day.
Related Posts with Thumbnails