If anyone's still listening out there I'm here to tell you things have been biz-ay in this corner of the world. Here are some visuals to help fill you in:
1. Graduated from business school on the hottest (in fact, the only hot day we've had) of the summer. I was sporting a lovely purple polyester gown that did not breath one tiny bit of air onto me. Blech. But a good day nonetheless!

2. Less than 48 hours later I started my job.

3. And then 8 days after that we closed on our first house!

And all that's left now is to get married. So about that wedding thing. We're 25 days out, and boy howdy do I have a lot still on the to-do table. I did manage to knock out the kids clothes, though, and the rest of this post details how to downsize (read: remake) a man's tie into a boy's. Read on if you've stayed up nights trying to figure this stuff out. Lord knows it took me a few attempts!
1. To start I used McCall's 4290. Note the size difference in the man's tie v. the boy's. I took the man's apart, laid the pattern piece on top, then cut to size. In the meantime, I also pulled out the interfacing and other "guts" and set them aside. Save the lining too.
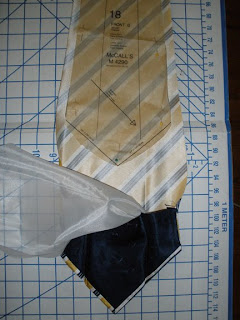
2. With the fabric cut down I then took the lining and cut it down so that its triangle was 1/2" narrower and placed it to the right side of the tie front, about 1/2" off of the left side. This is important! Do not center this piece. Stitch a 3/8" seam along the right side only.

3. Now pull the lining over to match it up with the left side, and stitch a 3/8" seam up to the end of the right side stitching. If you've done this correctly, the backside of the tie fabric will be puckering slightly.
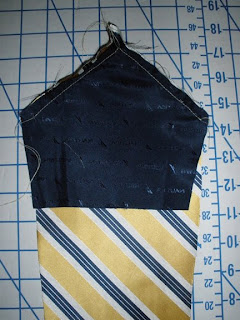
4. Now, fold the tie in half, right sides in. Stitch across the tip of the tie, about 1" down from the tip (along where I've drawn the red line).
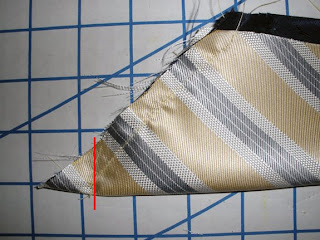
5. Time for a status check. Pull the lining piece down so that the ends of the tie fold over onto themselves and you get the little square at the tie point. Turn the tie right side out. If all has gone well, you should have one sharp looking tie point!
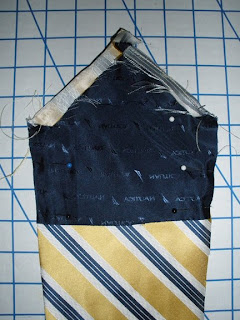

6. Return the tie to inside-out. Iron into place (this is the part that takes some patience and fabric wrestling), then stitch the lining and tie sides together, a 3/8" seam on each side. Take the stitching all the way up the sides to that it goes off the edges of the pointed part of the tie. *** These steps also work to finish the necktie end***

7. Now once again, turn the tie right side out. The sides should naturally fold in. Grab the original piece of interfacing from the tie and trim it so that it matches the "fold" lines on your child's pattern piece.

8. Insert the interfacing into the pocket you've made with the lining. You don't have to stitch it into place but it helps to pin it temporarily. Roll the sides over to cover the interfacing, then fell stitch the seam together. You'll want to stitch a small fabric loop to the back to catch the tie end (not shown here on mine but on the original one).

9. Flip it over and admire your work!

Alright, so that settles things for the munchkins. I've been cranking out some wedding favors that are freakin' cute if I do say so myself, but they'll stay under wraps until after the big day.


