Showing posts with label job. Show all posts

7.07.2009

All Tied Up

If anyone's still listening out there I'm here to tell you things have been biz-ay in this corner of the world. Here are some visuals to help fill you in:

1. Graduated from business school on the hottest (in fact, the only hot day we've had) of the summer. I was sporting a lovely purple polyester gown that did not breath one tiny bit of air onto me. Blech. But a good day nonetheless!
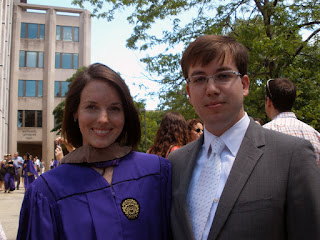
2. Less than 48 hours later I started my job.


3. And then 8 days after that we closed on our first house!

And all that's left now is to get married. So about that wedding thing. We're 25 days out, and boy howdy do I have a lot still on the to-do table. I did manage to knock out the kids clothes, though, and the rest of this post details how to downsize (read: remake) a man's tie into a boy's. Read on if you've stayed up nights trying to figure this stuff out. Lord knows it took me a few attempts!
1. To start I used McCall's 4290. Note the size difference in the man's tie v. the boy's. I took the man's apart, laid the pattern piece on top, then cut to size. In the meantime, I also pulled out the interfacing and other "guts" and set them aside. Save the lining too.
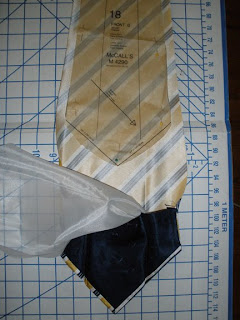
2. With the fabric cut down I then took the lining and cut it down so that its triangle was 1/2" narrower and placed it to the right side of the tie front, about 1/2" off of the left side. This is important! Do not center this piece. Stitch a 3/8" seam along the right side only.

3. Now pull the lining over to match it up with the left side, and stitch a 3/8" seam up to the end of the right side stitching. If you've done this correctly, the backside of the tie fabric will be puckering slightly.
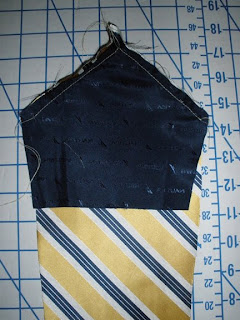
4. Now, fold the tie in half, right sides in. Stitch across the tip of the tie, about 1" down from the tip (along where I've drawn the red line).
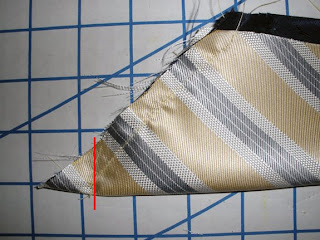
5. Time for a status check. Pull the lining piece down so that the ends of the tie fold over onto themselves and you get the little square at the tie point. Turn the tie right side out. If all has gone well, you should have one sharp looking tie point!
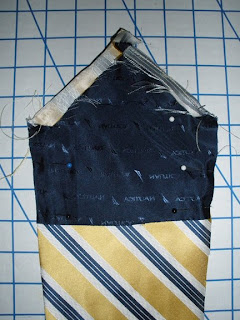
6. Return the tie to inside-out. Iron into place (this is the part that takes some patience and fabric wrestling), then stitch the lining and tie sides together, a 3/8" seam on each side. Take the stitching all the way up the sides to that it goes off the edges of the pointed part of the tie. *** These steps also work to finish the necktie end***

7. Now once again, turn the tie right side out. The sides should naturally fold in. Grab the original piece of interfacing from the tie and trim it so that it matches the "fold" lines on your child's pattern piece.

8. Insert the interfacing into the pocket you've made with the lining. You don't have to stitch it into place but it helps to pin it temporarily. Roll the sides over to cover the interfacing, then fell stitch the seam together. You'll want to stitch a small fabric loop to the back to catch the tie end (not shown here on mine but on the original one).

9. Flip it over and admire your work!

Alright, so that settles things for the munchkins. I've been cranking out some wedding favors that are freakin' cute if I do say so myself, but they'll stay under wraps until after the big day.

12.10.2008

A Missed Opportunity?

I'm starting to wonder if instead of taking my job at a hospital system next year perhaps I should have turned it down to outfit grad students in need of party clothes? A bit of background: it's finals time around here, which also means people are eagerly counting down the days until the KSM ski trip. This trip consists of approximately 600 students skiing by day, socializing by night. Like everything at our school, students organized this shindig and two of the leaders happened to be in need of some attire for theme parties. Corporate board members have to show up in suits to be taken seriously so shouldn't the ski trip committee show up in perfectly rad 80's and/or rocker gear? But of course.

Behold the modified (previously large and baggy) t-shirt for a Guitar Hero Battle of the Bands:

(pardon the bad picture quality - cell phones are still not cameras!)

And now the winner of "it's so bad it's good" shirt for the storied 80s party. If there's one theme we love around here it's "80s" and people honestly have costume collections just for these occasions.


Yet one can never have enough tacky 80s gear. So the next challenge was to replicate this pink and black shirt from the 80s band Flock of Seagulls. It started with a regular black button-down shirt from the Gap. I then broke out the trace paper to draft the totally gnarly pink bib, as I call it.


Once I figured out the right size I stitched up a piece like a pillow sham then added some trim to give it typical 80s geometric flair. Next I stitched the bib on one side of the shirt; I left the other sides loose and used velcro to afix all the other corners and edges.


The other defining feature of this couture piece is the popped collar with pink underneath. (M would love this and many can attest that he is a devout collar-popper to this day. Bonus points if the shirt is pink. He's from the South, no further explanation needed.) I grabbed a pattern piece from another shirt and it was a close enough match, this being a costume and all. The fact that the pink extends just beyond the black actually works, I think. Gives it more edginess. That got stitched on and then some buttons were added at the top corners for the finishing touch.


Right now it's pretty fug, let's be honest. But once the proud owner of the shirt gets his hair done and tucks the shirt into some nice acid-washed jeans I think it'll complete the look. I expect pictures of these shirts and the stole in action...


11.18.2008

Mess o' Muslins

In the first post Emily spied one of the many muslins I've worked on and have subsequently discarded. First I tried a pleated bottom with a dropped waist:


The fit was great. The style...not quite there. So then it was the mermaid silhouette with a whole lot of seam detail:


I felt a bit too much like Babette from Beauty and the Beast so this got put aside too. Perhaps a change to the top? Fewer seams?


Strike three. Some more iterations on these themes were tried and nothing was working. I missed those pleats, too. Then came this version:


The fit was getting there, the silhouette was slim but not overly emphasizing the wrong things, and the top was close to that Amsale one from the post below. My friend N, who has been my own personal Tim Gunn, was also liking it. But it wasn't "The One." In other words, I wasn't crying with bridal delight when wearing it, as one is supposedly expected to do when it IS "The One." But if I were crying, I'd have a convenient, spacious place to stash the tissues in the top, and that's when I realized the problem with this one. Thus #6 was nixed and left me thinking, is 7 really lucky?


It sure was! (Please excuse the quick and rough Photoshop job.) And what a frankenpattern this concoction is. The skirt came from here, the bodice from here, and the back from here.


I guessed on the train and it works. My favorite part of the train is that when it's bustled, it just tucks up under the second pleated tier so I don't have a mass of fabric hanging from my rear end or trailing closely behind me like my dog does when he inevitably wants to go out in a blizzard. I need to tweak the bodice just a bit so that it's cleanly pleated like the JCrew top but otherwise, this one's a go.


I was in NYC last week for some interviews and by some crazy stroke of good luck the company put me up in a hotel in the garment district. Score! There were fabric shops within steps of my door so I had to check them out, including the famed Mood. One of these holes in the wall had beautiful silk taffeta. I talked them down on price and snapped up 8 yards. My sister then dropped by with her serger for me to borrow. So to sum up that trip, I don't know if I got the job but I left with wedding dress fabric and the nifty serger - a prosperous trip one way or the other!

Related Posts with Thumbnails