Showing posts with label wedding. Show all posts

8.24.2009

Married!

Hello all! I'm back and I've got pictures just as promised. All of the images are courtesy of our amazing photographer, Jack Looney. Endless, endless thank-yous to him for capturing so many special moments for us. And, I can now finally reveal all of the other projects I was sewing or working on in some other crafty manner. Lots of images to follow so head's up!

I suppose we should start with THE DRESS. In short, I loved it and it was so much fun to wear.

It was simple but had some panache with the taffeta and bit of ruffled hem.


This also helped to give a more dramatic silhouette when bustled.


The silk breathed as well as it could in 88 degree heat, with a dash of humidity. The bodice held its form well through the day, despite my fear of skimping on the structure inside.

My only complaint? The damn zipper in the back. If you'll remember this post where I was pleased as punch with my zipper installation, you may be wondering what went wrong. Well, here's the rule for all those working on wedding dresses: leave it alone! It is more likely to be right the first time. I embarked on minor alterations about a month before the wedding because I was worried the waist band was just a tad snug and therefore not allowing the dress to truly hang on my shoulders. WRONG. That zipper never laid the same way again and the back two panels had minor (but noticable to me) wrinkles from the fabric pulling. I really don't know what happened when I put the zipper back in but it was never the same. ARGH. So, as much as I loved the back of the dress, I prefer the pictures of it from a distance.


So on to the other handmade items. First up is my hair piece, which I cannot take credit for but will rather give to Lulusplendor on Etsy. When you can't make it yourself I swear that site is the next best thing. (See what I'm talking about with the wrinkles on the butt? BLECH. Thankfully the nature of the taffeta helped disguise that a bit.)

The feathers in the fascinator also worked quite well with the boutonierre's Matt made, to give a nod to his beloved fly fishing.


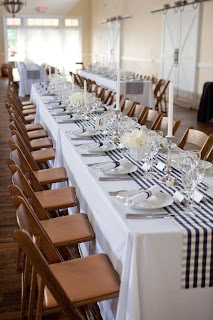
As you can see, the guys wore navy blazers and white linen pants, which worked quite well with the table runners I whipped up days before the event. The fabric came from IKEA and in a brief moment of lapsed judgment, I had planned to actually cut and hem all 18 of these babies. Then I remembered the pinking shears - deep sigh of relief! Those things are worth their weight in gold, despite the small blister I got on my finger! And the make-your-own-table-runners is a good tactic for avoiding extra cleaning fees from the linen vendor if you have tall, drippy candles like we did.


Let's go in for a closer look, shall we? Because then I can finally show you those favors I mentioned more than once! Together Matt and I made cotton webbing key fobs and used about 8 different kinds of jacquard ribbon. Though we were intentional in our original assignment of the favors, we later discovered there was a secondary market for them and people were bartering for different ribbon patterns! They were a crowd pleaser and I particularly liked that we could incorporate them into the table setting as napkin rings.


And as for my two favorite munchkins, here is the flower girl in her dress (which she loved to twirl around in because it was long, I later learned) and the junior groomsman in his scaled-down tie. (Aren't these fun pictures? The photographer set up a photobooth of sorts and people went to town after all the serious stuff was over!)


To close up this discussion on all things handmade, here's a shot of our wedding programs. This little project morphed into a big one, as I added more things to the packet. Inside was a list of the wedding party, the dinner menu, the seating arrangements, and a thank-you note to all the guests done with a bit of humor. I liked the programs because constructing them kept me busy on the 12 hour drive down to Virginia, while the guests liked them because they kept them busy waiting for the show to start!

And so that about does it for us. Now that I'm hitched, what's coming down the sewing pike? HOUSE STUFF! Curtains, bedding, and all other fabric finery is in my future. And perhaps a little cocktail dress for my friend's upcoming nuptials.
P.S. If you want details on how anything was made, just ask! The post was just getting a tad long...

7.07.2009

All Tied Up

If anyone's still listening out there I'm here to tell you things have been biz-ay in this corner of the world. Here are some visuals to help fill you in:

1. Graduated from business school on the hottest (in fact, the only hot day we've had) of the summer. I was sporting a lovely purple polyester gown that did not breath one tiny bit of air onto me. Blech. But a good day nonetheless!

2. Less than 48 hours later I started my job.


3. And then 8 days after that we closed on our first house!

And all that's left now is to get married. So about that wedding thing. We're 25 days out, and boy howdy do I have a lot still on the to-do table. I did manage to knock out the kids clothes, though, and the rest of this post details how to downsize (read: remake) a man's tie into a boy's. Read on if you've stayed up nights trying to figure this stuff out. Lord knows it took me a few attempts!
1. To start I used McCall's 4290. Note the size difference in the man's tie v. the boy's. I took the man's apart, laid the pattern piece on top, then cut to size. In the meantime, I also pulled out the interfacing and other "guts" and set them aside. Save the lining too.

2. With the fabric cut down I then took the lining and cut it down so that its triangle was 1/2" narrower and placed it to the right side of the tie front, about 1/2" off of the left side. This is important! Do not center this piece. Stitch a 3/8" seam along the right side only.

3. Now pull the lining over to match it up with the left side, and stitch a 3/8" seam up to the end of the right side stitching. If you've done this correctly, the backside of the tie fabric will be puckering slightly.

4. Now, fold the tie in half, right sides in. Stitch across the tip of the tie, about 1" down from the tip (along where I've drawn the red line).

5. Time for a status check. Pull the lining piece down so that the ends of the tie fold over onto themselves and you get the little square at the tie point. Turn the tie right side out. If all has gone well, you should have one sharp looking tie point!

6. Return the tie to inside-out. Iron into place (this is the part that takes some patience and fabric wrestling), then stitch the lining and tie sides together, a 3/8" seam on each side. Take the stitching all the way up the sides to that it goes off the edges of the pointed part of the tie. *** These steps also work to finish the necktie end***

7. Now once again, turn the tie right side out. The sides should naturally fold in. Grab the original piece of interfacing from the tie and trim it so that it matches the "fold" lines on your child's pattern piece.

8. Insert the interfacing into the pocket you've made with the lining. You don't have to stitch it into place but it helps to pin it temporarily. Roll the sides over to cover the interfacing, then fell stitch the seam together. You'll want to stitch a small fabric loop to the back to catch the tie end (not shown here on mine but on the original one).

9. Flip it over and admire your work!

Alright, so that settles things for the munchkins. I've been cranking out some wedding favors that are freakin' cute if I do say so myself, but they'll stay under wraps until after the big day.

4.27.2009

Kids' Clothes - Part 1

As promised, I'm back with a post about the flower girl's dress (or dresses, as it turns out). You'll notice that this post is titled Part 1, implying there will be a Part 2. Right you are! That will come tomorrow.

Anyway, I've got two sundresses for the staring darling and I'm pretty happy with both. First, some explanation as to why there are two. Long before I settled on bridesmaid dresses or any other wedding day colors I found a bold crunchy taffeta home dec fabric that I just adored. I quickly snatched up enough to make a dress without a care in the world if it would ever get a place in the wedding; I just wanted to see the fabric come to life in some way. So, here's #1. It's brought to us by the out-of-print Simplicity 8610 pattern that I can't even find online (sorry!):


Nevermind the fuzzy photo - check out those matched seams!

The dress is fully lined in a carnation pink polyester china silk with invisible zipper.

Fast forward about 4 months when I finally, if somewhat hastily, settle on the color for the 'maids. As mentioned, it's a variation of teal and has the amazing ability to make dress viewers yawn when it's on the hanger but then suddenly wake up when it's being worn. In short, seeing is believing with this dress. Since everything else in the wedding is either gray or ivory I really thought for an instant that the flower girl could still wear the checked dress and all would be swell. Not so much.
This led to me looking around for both a color that would complement the teal and a fabric that would be appropriate for a mid- to late-summer wedding. Enter buttercup yellow with white stripes (and cue looks of disbelief from anyone who knows me and is aware of my typical aversion to yellow). I found a remnant at Vogue and thought I'd give it a try. Dress #2 is from Butterick 3762 with absolutely no extras on it (collar, sleeves, pleated waistband - nothing).

This dress is not yet hemmed because I'm waiting until we go to Virginia in a few weeks and the flower girl can try it on. Everything else is complete though. The sash loops were done with embroidery thread in white because I am assuming that the teal sash will be exchanged for a white or yellow one post wedding soiree. You can probably tell that dresses 1 and 2 are virtually the same style but 2 is longer. Again, depending on the "fitting" next weekend I will hem it just a little or several inches!
So what to do with #1? I'll be passing it over as an option for the rehearsal dinner. I'm certainly not one to dictate what the wedding party must wear for two days but I figure, hey, it's made and I sure can't get any use out of it!

4.19.2009

Spring Has Sprung

Though the dress is finished the sewing projects are not! However, a quick look at the date of my last posting would suggest I had signed out of the interwebs forever. No, instead it was just the start of my final quarter here and sweet jebus did things start off with a bang. I don't know why I'm surprised anymore when I suddenly lose control of my calendar.
Remember that green polka-dot fabric I talked about weeks back? Yeah, well, it finally materialized into something (ha...ha...). What we've got here is McCall 5525 - a basic trench coat with some variations for the creative sewist. I stuck with view D but took the sleeves from A.


There's nothing remarkable about the construction. I used a light weight cotton duck fabric and lined it with a polyester china silk. While I loved the crisp green fabric I was only moderately happy with the lining. After working with gorgeous real silks on my last two endeavors I'll admit I've become something of a natural fibers snob!


If you look closely you can see the back vent, which is a nice detail on a fitted jacket like this one. I made a muslin of the coat body but no sleeves to check the sizing and that was all fine and good. However, I somewhat wish I had done at least one sleeve because they could probably stand to be a half inch longer. Still, I'm happy with it and got some lovely compliments when sporting it on a sunny Easter Sunday.

Speaking of sunny, here's a preview of the flower girl's dress. It's just about done, save for the hem and a real satin sash (what's on it now is just a fabric scrap to get an idea of color). I'm headed down to Virginia with Matt in May to do wedding planning stuff and I'll be taking this with me to size up the little munchkin.

It will get its own post next, and hopefully much sooner than this one took!

4.02.2009

It's Done!


The dress is done! It's actually been finished since Monday but that was the very same day that spring quarter kicked off and it did so with a vengeance. The weekend is poised to be equally busy so I thought I'd squeak this in now despite the chance it will probably be a shorter post. Also, I'll just say now that I don't have one overall great photo of the dress. The need to clean up the sewing room and get the dress put away safely, on top of no good place to stage a photoshoot, precluded me from getting any "ooh" or "ahh" -worthy pictures. I suppose you'll have to wait until August!
Below are a bunch of detail shots. Putting modesty aside for a moment, I'm pretty impressed with that back zipper and the trim. If you could lift up the zipper pull you'd see that the trim pattern is perfectly matched and the three bars seen on the far right meet up just so at the middle, too.

The skirt hem was embellished with small bugle beads that match the waist trim and neckline. I spaced them about ever 3/8" after first trying to get a continuous line of them, then realizing I would be bald on my wedding day from having pulled all my hair out in the process of beading! The other hem shot shows construction details: 1" horsehair just above the bead line, then the stitch line of the ruffles, then 1/2" horsehair on the skirt hem to finish it off, and lastly a narrow hem on the ruffle band.


And lastly, two looks on the inside. The monogram made it after all! I used it as a small patch to then stitch the tulle band together at the center back seam.

Finally, there will be no garter toss at this affair. So for a glimpse at the underside of the dress, here you go!

It feels great to have completed the dress. I'm really thrilled with it and it does give a huge sense of accomplishment and pride. However, I'm also relieved to put it in a garment bag and move on to the millions of other tasks! Next up is the flower girl's dress and possibly a suit for the ring bearer, but that depends on what get-up Matt selects for the gents. I've had a ton of questions about wedding theme colors and didn't have an answer until about a week ago. Then, while trolling some favorite sites this week, my choices were confirmed as "my colors" were all over the place, and in some fabulous applications! See if you can figure them out (it shouldn't be hard):

from http://www.swsmag.net/

from http://www.dressaday.com/dressaday.html

from http://www.thisyounghouse.com/

There are some cool fabric samples in these colors strewn about the room but I'm just too lazy to scan them in to share. Check back later!

2.11.2009

Wedding Dress Wednesday - #4

The title is a bit of false advertising, as I have nothing to show this week as it relates to the dress itself. However, while wasting time in between group meetings I started thinking about what to do with my hair. This led to thoughts of veil alternatives, since my mom and I have decided veils just don't work on me. So in lieu of my handcrafted goods, check out the fabulous work of others (in no particular order) from that site we all love: Etsy.

I like the overall size and scale of this number, and for that matter the variety of materials. The splash of netting gives a nice hint of a veil without taking the full plunge. From Brendasbridalveils.


I'm a sucker for all things Deco and the chandelier jewels with the feather spray is right on the money. From hemsandbustles.


This little number is pretty clean and has a decidedly 50s flare to it with that Sputnik-inspired brooch. Since my dress also has a bit of the 50s in it, maybe this would work? From lulusplendor.

And then there's this one with the biggest honkin' rhinestone but the daintiest of feathers. I like it, but wonder if it's too small to create the kind of impact one goes for when sporting a fascinator? From penellibelle.

So, what do you think? I'm not commiting to anything until the dress is somewhat built so I can get a better idea of the overall feel but it's fun to start looking.
Related Posts with Thumbnails